Sunday, 7 October 2012

Summary for those with a short attention span

As promised, here's a visual recap with short sentences for those who can't be ar*ed to read the whole blog :)

 had a Renault Trafic campervan, loved it but it was too big for daily use

 took it to Glastonbury (twice)

 didn't want one of these coz it's cheating! a house on wheels lol

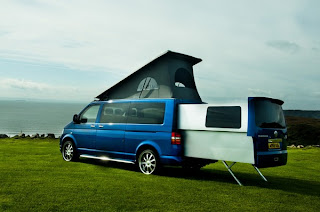
 would have LOVED one of these, but they're so damned expensive!

settled on this Citroen Dispatch from eBay

it was ply lined and had filled in back doors

bought replacement doors on eBay

got a load of free foam/cushions from the nice people at the doors place

got the dog to help with the carpentry. NOT. he is cute though eh?

built ply storage units/seats both sides
the wood bits in the middle lift out and store by the doors when not in use
also installed a black Ikea kitchen cabinet for storage and a sink on the top

had vinyl floor installed
painted units black

lined interior with carpet

painted/carpeted tops of units/bits of wood

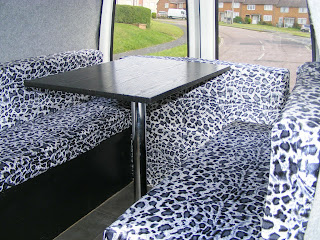
covered foam cushions with velour

bed when made up

view from side when bed made up

view from side with table put in

the porta potti stores nicely behind the table

view from the back - finished!

Hope you've enjoyed the summary - by the way it's the first time I've ever done a van conversion, and I made up a lot of it as I went along, so if you want to pick my brains, I'm happy to answer any questions you have...

TTFN

Naomi
xxx

'Tis finished!!!

It's been two months since I updated this blog - my bad. The van is now finished, and in fact has been for about, well, 2 months! We've even managed a couple of trips to the New Forest in it, which was great fun - there's nothing like rocking up to a campsite, knowing that once you're parked up, that's it, you're sorted. The only things you have pack are the food, drink and dogs :)

Suffice to say I LOVE my little van, and exactly as planned, I'm also using it everyday as my main vehicle. I can even reverse park it straight (on a good day). It's also dead handy for shopping, and for my car boot sale adventures (buying and selling).

Last time I updated this blog, the units were finished and the flooring had been put in. To finish the van, I did the following:

  • carpet-lined the interior - this wasn't nearly as hard as I thought it would be
  • covered the tops of the storage units/seating with carpet
  • covered my foam cushions with gorgeous grey leopard print velour
  • put up some lights (LED battery powered ones that stick to the walls with velcro)

In summary, and for those of you new to this blog, the van has running water, seats/table with loads of storage which convert into a lovely comfy bed (big enough for two adults and three dogs to sleep comfortably), and space to store a porta potti too. No leisure battery, no complicated electrics, no built in cooker. The more complicated something is, the more likely it is to break or go wrong I find...

So without further ado, here she is in all her glory:


 above and below is the fold down flap that creates one end of the bed....


Just a final word about the nitty gritty - how much did it cost. Because I know you're all dead nosy! I am too if it's any consolation! Firstly here's a quick recap on the 'ingredients' for my conversion (in no particular order):

  • 12mm/18mm plywood
  • some lengths of timber
  • kitchen unit from Ikea
  • vinyl flooring
  • hand pump tap
  • stainless steel dog bowl 'sink'
  • fablon to cover table
  • table leg and bracket
  • foam for cushions
  • fabric to cover foam
  • satin paint
  • carpet for lining & spray glue
  • porta potti
  • LED lights & batteries
  • lots of love and care from yours truly

As for cost, including all of the above (plus the cost of 1.5 days labour, excluding the porta potti, which was a present from my dad!), I'm pleased that I managed the whole conversion for around £600 (give or take the odd tenner).

So that's it! The van is finished, the blog is finished probably for this year (we're already planning to take her to Bestival next year though, so don't be surprised to see the odd update now and then).

Lastly, if you're reading this for the first time, please take a minute/hour/day to read the other posts from the beginning - it makes more sense, and is more entertaining (even if I say so myself) and informative to read it from the start. 

For those of you who can't be ar*ed reading the whole blog, I'll be adding another post shortly, which will be a quick-fire recap/how-to with photos from start to finish...

Hasta la vista mis campervanconverting amigos

xxxx

Wednesday, 8 August 2012

Foam (and paint) Party

LONG TIME NO SEE

Seems like ages since I've done a post here - in fact it is almost two weeks. I haven't been a lazy bum and done nothing to the van, but I've definitely been a lazy bum when it comes to updating the blog!

Anyway exciting news - the van is very nearly completed (yayyyy), but I still have a heap of pictures to take of it in its current state.


SORRY

Before I update you on the progress, I should first apologise for the ridiculous non-Summer weather we've been having. It must be my fault, because since I bought the van and decided to spend the rest of the summer camping at weekends, it feels like it's done nothing but rain here in the usually sunny Southampton.

Still, the forecast looks better for the next few days, so hopefully we can christen the van soon! I still need a name for him/her, but I don't have any ideas at the moment - perhaps if any of you do, then you could let me know...


THERE WERE THREE IN THE BED AND THE LITTLE ONE SAID...

I just realised I haven't properly shown yet how the bed works, so here it is. Here's the table before being fixed to the floor:


The left hand unit as you see it above has a flap out bit that extends and rests on the wood that's behind the front seats. The back middle is the table that will come off its leg and sit between the two units, resting on battens attached to the units. There's one last piece of wood that makes up the far middle, this has been cut to fit around the kitchen unit (and will be stored at the back of the van when not in use).


The bed is practically king size at the back of the van (the head end), and almost double at the feet end. We've got to fit 3 dogs in too, so it will definitely be cosy to say the least! Oh and you can still use the sink/water at night...


FOAM PARTY

Here's the foam pieces once I had decided exactly how the jigsaw puzzle would fit together - basically two rectangular seats, two backs, and a few extra bits to fill the gaps. Bearing in mind that I got all the foam free, it's worked out nicely thank you. Not exactly a party I know, but I liked the title!

I'll show you my gorgeous covered cushions in a forthcoming post.


Oh and here's the sink* with hand pump tap fitted:


*sinks are SO expensive (tiny boat/caravanny ones are pricier than full sized kitchen ones?!), so since we knew that we were hardly going to use it, we decided to go for the cheapest thing we could think of - I have to thank hubby for this idea (okay so there's no waste outlet or pipe, but we don't need it) - it's a stainless steel dog bowl and it cost £3!!!


PAINTING MY WAGON

Lastly as you can probably see from the previous pictures, I filled all of the screw holes with filler, sanded them down, then painted the ply black. It took 2 good coats plus a few touch ups and I used satin paint which has given a lovely finish. It's also wipe clean, which will come in handy when we've been for muddy walks with the hounds...


In the next post, I'll show you the carpeting of the inside of the van - and what a transformation it's made.

Until then, my smallmotorhomingcampervanning friends

N
x

Friday, 27 July 2012

The flooring is in!

I love it when a plan comes together! I organised for my nephew Tony (http://www.tonybakerflooring.co.ukto visit in order to measure up the van for flooring (I told him it was a 'little job' and in he came, armed with carpet samples - only to be told it wasn't carpet and wasn't for in the house).

Anyway I led him to the van, told him what I wanted, and guess what, he already had some vinyl in the van, in exactly the colour/style that I would have chosen anyway. Love it!

20 minutes later and voilĂ  - I have a great quality, hardwearing, thick vinyl floor glued down, with sealant around the edges, and a lovely silver trim at the back (he's nothing if not a perfectionist).

Here are the pics!


Having also had a visit today from bro-in-law, I am now the proud owner of a table in the middle of the units (I just need to buy another table leg connector as they only had one in stock), and another piece of ply cut to fit the end of the bed (where my feet will go - I have already decided hubby will sleep on the left).

Talking of hubby, it's about time I introduced him - his name is Steve, and here he is driving the van with his 'I'm concentrating' face on:


Many more pics to come of us both, as I intend to blog not only the conversion but also our future camping adventures!

Anyway back to the van - my tap is in and working too! I'm storing the water container under one of the units, which gives me use of the Ikea cupboard/unit purely for kitchen stuff, and also means that I can access the water container from outside the van, once the side door is open. More pics to follow of this set-up.

Like I said, I love it when a plan comes together...

Almost forgot, I also ordered my stretch carpet from eBay today, and it'll be arriving next Tuesday, so I'll have a fun time installing it (that's going to be the biggest challenge methinks). The people I bought it from were very helpful, and instead of the listed 5m length, I managed to get just what I needed from them (4m length plus glue) for a great price (they have a shop here selling all sorts of foam supplies). Colour-wise I went for silver, as the front of the van is already lined in that (or near to that) colour.

Today's 'still to do' list:
  • paint the ply units now that the furniture part is all finished - I think I'll keep everything sleek in black
  • line the walls (once the carpet arrives)
  • buy the fabric to cover my foam cushions
  • buy bits and bobs like new stove, portapotti etc (without going too mad)
Til we next meet...

Naomi
x

P.S.
Off topic, but I can't hold it in any longer - we're going to have a new addition to our family. Not a small person, but even better (in my humble opinion) - another dog! We're adopting him from a friend of ours, his name's Rory, and he's a Shih Tzu, the same breed as Stewie (who supervised installation of the van units and generally follows me everywhere).

Here are a few pics:


Wednesday, 25 July 2012

The units are in!

Hi all

Here's an update of the progress so far on the van. New windowed back doors are on, and incidentally the people at the breakers yard also gave me a free rear view mirror, which helps! I can park with more confidence now, and windows let in loads more light.


I've decided on 2 seating units facing each other, with the table in the middle converting into the middle of the bed, and a small unit behind the driver's seat for the sink/cooker. So a couple of sheets of 12mm ply and some 2 by 1 later, we (I say we, but I was just watching of course) started building the units (with Stewie on hand for advice):


The units have their own storage, with lids that have little holes in (there's probably a technical term for those) so that you can lift the top. It's all nice and flush too, and you can sand the edges of ply for a lovely finish (I'm sounding like I know what I'm talking about now).

Here's the kitchen unit, which I proudly built myself (assembled actually, Ikea make it dead simple). It's actually a kitchen wall cabinet, so its depth fits in just nice with the other units. Once installed in the van, we put some ply on top which extends to the door (NB the door still opens, so when we're cooking it's nice and airy).


We've also put some ply behind the front seats; this now has batten on half way up, which the ends of the bed will rest on. I've been rubbish and forgot to take enough pictures, but will take some more soon showing the full effect. The base unit on the left has a hinged fold out section, which makes up half of the bed end, and there'll be a table in the middle on an island leg, and another piece of ply for the remaining part of the bed.

All of this work took just 1 day, and the change is amazing! The van weirdly seems more spacious in the back now, even with more in it.

Still left to do:
  • install the tap (a hand pump one I bought from Towsure)
  • line the walls (I've discovered just the ticket on eBay - stretch carpet)
  • make the cushion covers (I am going for leopard after all, but probably black/grey instead of brown)
  • get some flooring in (nephew coming after work today to measure up for vinyl)
Doesn't sound like much, but as with all jobs, things always take longer than you think! I'm still on track to have the van 'campable' within the next few days...but I don't want to rush it.

Hopefully I can get the table/bed middle and tap fitting in the next couple of days, and the vinyl soon as poss too, then it's away with the tradesmen and down to me to do the finishing touches.

I can't wait!

For now, au revoir

N
x